Using the Input Wizard
To help users gain a quick understanding of the Liquid workflow, users can access a wizard to assist with the import process. If you have never imported a media clip, it's well worth running the wizard at least once just to see the workflow in action.
To import a media clip using the wizard:
- From the menu bar, select File > Input Wizard ( Figure 3.4 ). This opens the Input wizard ( Figure 3.5 ).
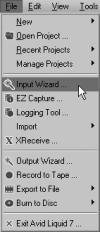
Figure 3.4 Selecting the Input wizard.
Figure 3.5 The various choices available in the Input wizard.
- Choose which media type you want by clicking the appropriate icon.
- You are asked to select the Rack to which you want to import the media file ( Figure 3.6 ). Remember, the Racks on your monitor may look different from the screen shot unless you have copied the layout. See Chapter 1, "Getting Started," for more details on creating Racks and Folders. Choose which Rack you want to use, and then click Select. This will bring up the Import Media window shown in Figure 3.2.

Figure 3.6 Select a Rack or create a new one from here.
- Browse to the file using the normal Windows functions.
- When you have located your chosen file, click once to select it, and then click Open or press Alt+O. The clip takes a moment to import and appears in the Rack you selected in step 3. Once imported into Liquid, you can alter the media clip any way you like without altering the original. Remember, Liquid is a nondestructive editor.
)
)
)
Search Media
The Search Media option ( Figure 3.7 ) is the third icon in the Input wizard and a very useful tool for tracking down those hard-to-find media clips. Don't overlook the importance of this tool. For sorting through your media, it will prove much quicker than poking around in a Windows directory looking for that lost MP3 file.
)
Figure 3.7 The Search and Import Media icon in the Input Wizard.
The interface contains many filtering options that you should use to stop a search from taking too long and to pinpoint the results with a little more accuracy.
The window in Figure 3.8 has been set up to search just the C drive for images. The results of that search are displayed in the top right window.
)
Figure 3.8 The Search Media window after it has searched the C drive for images.
By highlighting the images you want (using Ctrl+left-click and Shift+left-click) and then pressing the Down arrow, you can quickly select which images you want to import.
Clicking the Import button finishes this process and places your imports into a specially created Folder and Rack ( Figure 3.9 ). Note: By default, the Search Media Import folder is not open and you must double click it to see the Rack that contains your imported clips.Audio, video, and images Racks are automatically created during the import stage using the Search Media method, creating a pretty neat and quick method of collating your imports.
)
Figure 3.9 The new Search Media Import folder containing the imported files.
The Search Media function can also be accessed by using the menu bar and accessing File > Import > Search Media ( Figure 3.10 ).
)
Figure 3.10 Accessing the Search Media option from the menu bar.


)
No comments:
Post a Comment