Manually Importing a Media Clip
Importing a media clip without the wizard is an identical process, but without the handholding. This means that you must choose which Rack you want your import to be stored in before you begin. It's not a big step, and once you understand the import process, you will probably want to stop using the wizard completely.
To import a media clip:
- Check to make sure you have selected the correct Rack in the Project Browser. (By default, media clips will always be imported into the last selected Rack.) You select a Rack by simply clicking it in the left window of the Project Browser.
- To bring up the Import Media dialog ( Figure 3.14 ) do one of the following:
- Click the right window of the Project Browser and select Import ( Figure 3.11 ).
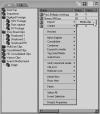
Figure 3.11 Open the Import Media window by right-clicking in the Project Browser...
- Select File > Import > Media ( Figure 3.12 ).
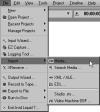
Figure 3.12 ...or use the Menu Bar...
- From the Quick Access Menu in the upper right of the Liquid interface, select Input > Import video, Import audio, or Import stills ( Figure 3.13 ).
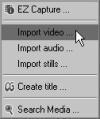
Figure 3.13 ...or use the new Quick Access menu.
- Click the right window of the Project Browser and select Import ( Figure 3.11 ).
- Use the Windows browser to locate the file you want to import.
- Highlight the media clip you want.
- Select whether you want to Link, Copy, or Move the media clip (see "Elements of the Import Media window" earlier in this chapter).
- Once all choices have been made, click Open or press Enter. The media clip will now import into the Rack you have selected in Step 1.
)
)
)
TIPs
- Just as you can in Windows, you can select more than one media clip to be imported at a time. Select multiple media clips by holding down the Shift key to select consecutive clips or by holding down the Ctrl key to select individual clips.
- By clicking once inside the file selection area and then pressing Shift+A, you can select all of the clips in this folder. Unsupported clips (operating system files) are not seen by Liquid and will not be selected.
- Liquid also allows you to drag and drop clips from Windows Explorer into the Project Browser.
- Liquid 7 introduced the new Quick Access menu for simplifying the core functions of the Timeline. See Chapters 1 and 6 for more details on the Quick Access menu.
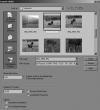
Figure 3.14 The Import Media window; For full details, see Figure 3.2 and the accompanying text description in the "Elements of the Import Media window" section earlier in this chapter.
)
Importing Animated Sequences
To import an animated sequence, you must first select the Autodetect animations check box under Options in the Import Media window (see Figure 3.2 ). Then select the first frame from the animation, and click Open or press Enter ( Figure 3.15 ).
)
Figure 3.15 The first frame of a TGA animation is highlighted.
This will create a single clip in the Project Browser ( Figure 3.16 ). When dragged to the Timeline, this single clip will be associated with the rest of the animated files stored on the hard drive and will display the animation on the Timeline or in the Source Viewer.
)
Figure 3.16 The animated clip in the Project Browser and also on the Timeline.
Note that this technique will only work with animated sequences—animations that exist as a series of individual images, not as a single compiled file.
Importing S/VCD and VOB Files
If you try to import an S/VCD or VOB file, a dialog will appear displaying the available audio and video tracks ( Figure 3.17 ). VOB files may display more than one audio file; this will probably contain the different language versions muxed into the VOB.
)
Figure 3.17 If you choose to import an S/VCD or VOB file using this screen, you will be able to preview the file before you finish importing it.
Once you have decided which audio track to use, click Preview to bring up a small inlay window inside which the S/VCD or VOB file will play ( Figure 3.18 ). You can monitor the audio through your PC sound card, and if you have the correct audio selected, you can click Import to import the files. If not, select another audio file and try again.
)
Figure 3.18 The Preview window opens under the selection screen once the Preview button is clicked.
It is not possible to import a VOB file (video object—MPEG2-compliant files found on a DVD) from a copy-protected DVD. To accomplish this, you need to copy it to your hard drive first and import from that location. You can acquire many popular tools on the Internet to do this.
You must also have an AC3 codec installed on your computer to use the audio in a VOB file.
Codecs are freely available from http://ac3filter.sourceforge.net.


)
No comments:
Post a Comment