What would it mean to your HDV editing workflow if you could insert multiple video formats into a Timeline? I found one answer to this question when I spent several weeks working with Avid's Liquid 7.1.
The question is a natural follow-on to most of what has been covered in the last few months in HDV@Work. When we looked in depth at interlaced HD and how it was processed by progressive displays, the issue at heart was converting one HD format to another. In the last few issues of HDV@Work, we explicitly examined the topic of media conversion when I dealt with the use of legacy video. Nevertheless, we never really addressed how various media could be brought together.
If one is working with Final Cut Pro, the solution is to convert the different video formats to the format you will use for editing the majority of your source material. With Liquid, the solution is far simpler -- simply edit with little, or no, regard to format. Right now, I have two HD sequences on my PC. One sequence was created as 720p30 HDV while the other sequence was created as 1080i60 HDV.
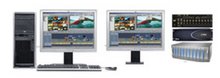
The 720p30 sequence contains: 720p30, 720p24 (yes, 24p), 1080i60, 16:9 DV, 4:3 DV, and 4:3 MPEG-1 shot with a cellphone in Malaysia. (I included the latter because it showed Muslim women and their kids enjoying a Christmas exhibit at a shopping mall in Kuala Lumpur at the same point in time when such exhibits were considered by some in America as “offensive” to non-Christians.) The screenshots below show how I customized Liquid's toolbars to meet my editing needs.
A 720p sequence in Avid's Liquid 7.1
The 1080i60 sequence begins with multiple Sony Z1 clips followed by the entire 720p sequence. I simply dragged the 720p sequence from Liquid’s Sequence Rack (bin) into the 1080i sequence.
My goal is to record the first sequence to HD1 (720p) and the second to HD2 (1080i), plus create widescreen DVDs and widescreen DV tapes from both sequences. Everything is ready for export.
Of course, we are way ahead of ourselves in this odyssey. We need to go back to NAB, where I saw an excellent demo of Liquid. I wound up watching the demo as a way to relax after learning Avid and Apple were not yet supporting 720p24 or 1080 24F. The demo quickly took my mind off 24fps. It was clear that Liquid had undergone a beneficial revision of its human interface.
Over almost a decade, I have reviewed what is now Liquid four times. My first review opened with this paragraph. “It's only fitting the FAST 601 is the first MPEG-2 system to undergo an in-depth review in Video Systems, as it is the first MPEG-2 system brought to market. Being first to market is always a mixed blessing. If the market is waiting eagerly for the new technology, being first is great. But when the market doesn't understand the new technology and so hasn't yet come to desire it, being first is problematic.”
So problematic, that by my third review I wrote, “Edition is the name Pinnacle has given to a version of purple -- which is the DV version of an NLE developed, several years ago, for blue. While blue was a work in progress from FAST of Germany, the NLE application developed for blue was shipped on FAST’s 601. (The 601 was a 50Mbps MPEG-2 NLE system that had the misfortune to be released at the height of DV-mania.)” Pinnacle had bought FAST and got 601, purple (the NLE software for the 601 and blue), and blue itself. Pinnacle named them Liquid. (Avid now owns Pinnacle Systems.)
It is ironic that years after FAST developed an MPEG-2 NLE, many of the other NLE suppliers are working feverishly to do the same. To date, this has meant simply hacking support for specific flavors of HDV. Had these companies developed an MPEG-2 engine that worked like a hardware codec -- as did FAST -- all the flavors of HDV would inherently have been supported.
Jumping back a few years, my second review covered Sony’s ill-fated ES-3 NLE. I began the review by saying, “The entire ES-3 is built for Sony by FAST of Germany. The software is identical to that on the FAST Silver (a.k.a. 601). Except for the InnoVision-designed CG, there are no pulldown menus. One either clicks on FAST-designed command icons (many of which you'll never have seen before) or right-clicks on an object to get a list of commands relevant to the object. Sounds neat, but often it is not. For example, after logging clips, I wanted to perform a batch-digitize. I could find no icon that 'looked like' it might do the job. Help told me to 'choose the command Batch Digitize from the Content area shortcut menu.' Duh! So I started right-clicking on every object and surface until I got the correct pop-up menu.”
Avid now refers to this GUI as Classic, and it is still available. For those purchasing Liquid today, the new GUI features a set of menus and is vastly easier to learn.
In my fourth review of Liquid, I described a powerful enhancement. I said, “Liquid Edition PRO significantly enhances the Edition rendering engine to support realtime preview.” As video frames were decompressed, the CPU rendered simple effects. Edition PRO shipped with a PCI card that contained analog I/O plus a GPU chip to co-render effects.
Pinnacle’s documentation (with the word Pinnacle replaced by the word Avid) now covers seven classes of effects: classic clip effects and classic transitions (none of which are realtime, but which can be background-rendered), CPU clip effects, CPU transition effects, GPU clip effects, GPU transition effects, and special effects. Special effects can use the CPU and/or GPU. (The GPU is no longer on a PCI card as the software uses your PC’s graphics processing unit.) The latter five effect classes have the potential to provide realtime previews, but also can be rendered in the background prior to export to tape.
What makes Liquid’s effects set difficult to comprehend is that the same filter can be available in multiple classes. Unfortunately, these filters may, depending on their class, have slightly different names and available features, use different algorithms (thereby offering potentially different quality levels), and may preclude, should you use them, certain downstream workflows. For example, the powerful realtime Color Correction function does not support keyframes. If you need keyframes, you will need to use the far less capable CC.
In the next few installments, I will share what I learned about working with Liquid 7.1. I will also cover topics that emerged precisely because of Liquid’s many strengths.
For those who decide to use Liquid, I will provide the specifics of my HDV workflow. And, of course, I’ll let you know how the HDV and DV exports looked -- and how well DVD creation worked.
In the last installment, I asked “What would it mean to your HDV editing workflow if you could insert multiple video formats into a Timeline?” We then began to examine this question by looking at Avid’s Liquid 7.1. I remarked that I created two HDV sequences using Liquid.
One sequence was created as HDV 720p30 and the other sequence was created as HDV 1080i60. The 720p30 sequence contained 720p30, 720p24, 1080i60, 16:9 DV, 4:3 DV, and QCIF MPEG-1. The 1080i60 sequence began with multiple Sony Z1 clips followed by the entire 720p sequence. I had simply dragged the 720p sequence from Liquid’s Sequence Rack (Bin) into the 1080i sequence.
In this installment, we will look at how I acquired the various source material used in these sequences. I captured, via FireWire, the 720p30, 480p60, 1080i60, 4:3 DV, and 16:9 DV. The QCIF MPEG-1 was imported from a file transferred from my cellphone, and the 720p24 was located on a Focus DR-HD100 hard drive.
Let’s look at how I captured these different formats. If you're working with Final Cut Pro, choose a Capture Preset for each video format you want to capture. If you have 720p24 video, you are currently out of luck because Apple has not yet provided a native HDV preset for that.
Liquid operates very differently. You begin by selecting the Rack you want to hold the captured clips and then select either the EZ Capture Tool or the Logging Tool. As you might guess, the latter tool has the capability to capture a marked video segment, log a segment, or batch-capture the logged segments.
Tip 1: Because the first-generation HDV 720p camcorder does not have timecode embedded in the M2V data stream, the tapes should not be used with the Logging Tool.
Unless one’s PC is storage-limited, there is really no need for the Logging tool, as the EZ Capture Tool will do all that is necessary to capture an entire tape. For this reason, I used the EZ Capture Tool for all my FireWire input. (Including 1394 capture from the Focus DR-HD100.)
When you bring up the EZ Capture Tool you can use the VTR control to locate the point(s) at which you want the capture to begin. Note I did not select a Capture Preset. Why not? From my point of view, the real question is why do I need to do so with other NLEs? One should not need to do so, given FireWire’s inherent functionality. When a device is connected, software interrogates the device. The device responds with its brand and model number. From this information the software can alter its communication protocol, if necessary, to match the device.
Tip 2: You do need to select the device brand when using the Logging Tool in Liquid. You also have the option of “Live 1394 Capture,” which allows you to add Time-of-Day Timecode to the recording.
The software also checks whether the device is set to send MPEG-2. (HDV devices have a switch that is set to either DV or MPEG-2.) So there is no need for a human to tell the software this basic information. But what about the type of DV or HDV?
Both DV and HDV bit streams carry detailed information about the nature of data carried by the streams. This information tells the software the frame size, aspect ratio, timecode base, frame rate, and interlaced/progressive status. Using this information, the software creates a header for the data that will be moved to a disk file during capture. Thus, once again, there is no need for a human to tell the computer what the computer can learn for itself.
Although 720p24 is not officially supported in 7.1, the software can discover that the timecode base is 59.94fps. The Repeat Flags carried in the data stream are stored to disk along with the M2V data.
Tip 3: Although first-generation JVC HDV devices are capable of outputting 24p via FireWire, Liquid erroneously rejects this data. Of course, since 24p is officially unsupported, this could be fixed in 7.2. Therefore, only (second-generation) JVC ProHD equipment can currently, and unofficially, be used to playback 24p.
Importing video is just as simple. It made no difference whether I selected a file on my PC’s hard drive or on the Focus drive. During import, the software “auto-sensed” the nature of the video. When you import from a mounted drive, such as the Focus HDD, you are given three options: Linked, Copy, and Move. The first option supports the DR-HD100’s DTE capability as all files remain on the Focus HDD. The second and third options copy or move the files to your hard disk, respectively.
Note that there is no need for video to be “converted” during import. A Liquid Timeline can hold most any type of video: DV and DVCPRO (both can be input and output via FireWire, including transfers from P2-based camcorders), DVCPRO 50 (file import and export only), XDCAM and XDCAM HD (using FireWire-based File Access Mode via Liquid’s XReceive/Xsend capability), MPEG I-frame (IMX), MPEG IBP including HDV, Windows Media, DivX, and MPEG-4, as well as SD and HD 4:2:2 uncompressed video. While SD MPEG-4 is supported, it appears HD is not. Likewise, neither DVCPRO HD nor any of the new AVC codecs are supported for either import or capture. (It would be ideal if the DVCPRO HD codec were available for FireWire export.)
Liquid Pro, which includes an analog SD breakout box for I/O, adds support for composite, Y/C, and SD component I/O. This BOB connects via a USB port so it can be used with a laptop. It is ideal for those who need to work with Beta SP — especially for the export of SD versions of HD productions.
Liquid Chrome employs a PCI card and an SDI/HD-SDI BOB that supports four embedded and AES/EBU digital audio channels. Using HD 4:2:2 uncompressed video, this option provides support for HDCAM, DVCPRO 50, and DVCPRO HD.
After capture or import, Scene Detection can be employed to divide a clip into subclips. This feature worked perfectly with both DV and HDV.
Tip 4: Be sure to request Master subclips and specify handles of at least one frame. By providing handles, Liquid’s Consolidate capability can be used when a project is complete. This function will retain only the video used by the project while removing all unused media. The result can be stored to DVD or, in the future, to Blu-ray discs.
In the next installment, we will explore how all these various formats can be used in a sequence and how a very wide range of productions can be automatically generated from a mixed-format sequence.
In the first installment, I asked “What would it mean to your HDV editing workflow if you could insert multiple video formats into a timeline?” We then began to examine this question by looking at Avid’s Liquid 7.1, with which I had created two HDV sequences. (See Part 2 here.)
One sequence was HDV 720p30 and the other sequence was HDV 1080i60. The 720p30 sequence contained 720p30, 720p24, 1080i60, 16:9 DV, 4:3 DV, and QCIF MPEG-1. The 1080i60 sequence began with multiple 1080i clips followed by the entire 720p sequence. In this installment, we will look at how I created these sequences.
For those of you who have edited DV exclusively, the obvious question is what kind of sequence can hold multiple formats. You have learned, often the hard way, that bad things happen when your sequence preset does not exactly match your DV source in every detail. Obviously, this rule cannot be applicable to an NLE that supports multiple formats in a sequence.
To understand why this rule no longer holds, I’ll ask a rhetorical question. Why do we need to define the nature of a sequence? The answer is that the NLE needs, at minimum, two items of information: image aspect ratio and pixel aspect ratio. The first is needed to define the aspect ratio of the recorder monitor created on our computer’s monitor. Note, the player monitor’s aspect ratio(s) is defined by the source format(s). Pixel aspect ratio is required when conversions are made between square and non-square pixel video.
You will note that I did not define frame rate to be one of the necessary sequence parameters — and it’s not. It is possible for a timeline to be defined in terms of time. In such a timeline, a second is a second. Liquid operates using this system. The playback engine notes a source’s frame rate and displays frames at exactly the rate necessary for one second’s worth of video to be presented in one second. Likewise, a source’s audio sampling rate determines how many samples must be output per second. This is how multiple frame and sample rates can be mixed within a sequence.
Unfortunately, Liquid does not take this capability to its logical conclusion—a timeline where timecode is fully replaced by “time.” With time notation, a gap from 5.25 minutes to 8.50 minutes would require 3.25 minutes of source. It would make no difference what frame rate were used by the source.
With this understanding, let’s create a new sequence in Liquid. We can give the sequence a unique name — or let Liquid auto-increment a name. We can then select a Layout Template. (I will cover this time-saving feature at the end of this Installment.)
Now, if we like, we can choose from a list of presets that currently includes this subset of DV and HDV that's relevant to Region 60: NTSC 4:3, NTSC 16:9, HDV 720/29.97p, and HDV 1080/59.94i. Obviously, if I were working with Sony HDV, I would simply select “HDV 1080/59.94i.” This would automatically define frame rate, resolution, interlace field order, and M2V codec.
When a frame of video is needed by the NLE’s display or effects engine, the appropriate codec is employed to decompress (DVC) or decode (MPEG) to uncompressed YUV data. For display on a computer monitor, the YUV data must be converted to RGB data. However, if your computer has a board that outputs analog component or HD-SDI, the data are not converted and so remain in YUV colorspace.
Depending which NLE you use, its effects engine works either in YUV or RGB colorspace. (One exception is Premiere when using CineForm YUV effects rather than Premiere’s RGB effects.) There are two advantages of working with only with YUV data. First, color errors can result from the conversion to and from YUV and RGB colorspaces. Second, video clipping can occur when YUV data are converted to RGB data.
A recorded video signal often is higher than 100IRE — yielding digital YUV values greater than “240.” (Legal digital values range from “16” for 0IRE to “240” for 100IRE.) Moreover, if you alter your camera’s Pedestal setting, recorded data may be lower than “16.” When YUV data are converted to RGB data, the YUV values between “16” and “240” are mapped to RGB values from “0” to 255.” Thus, YUV values below “16” or above “240” are truncated and valuable information is lost. (With FCP, you must enable “Super White” to prevent truncation.)
While Liquid’s realtime effects work in RGB colorspace, you can avoid clipping by adjusting White and/or Black levels using the Color Corrector. Liquid has several CC functions — one that supports both Primary (realtime) and Secondary (non-realtime) correction as well as a vectorscope and waveform monitor. (This CC has White and Black level controls as well as a Soft Clip function.) Unfortunately, this corrector does not support key-frames. The alternate, Base, CC function does support key-frames — although regrettably, only realtime Primary correction is supported and scopes are not available. Both correctors map YUV 0-255 to RGB colorspace that employs 16-bits per-component. Thus, no input signal truncation occurs when using these correctors.
Tip 5: For work that must meet broadcast standards, Liquid’s Soft Clip function, that limits video to 100IRE, should be applied to each clip. The Soft Clipping feature is found within Liquid’s Color Correction Legalizer. While you must enable the CCIR-601 function, you should not enable the “Work only in CCIR-601” mode. Now, while watching Liquid’s waveform monitor, dial in the amount of soft clipping you want. You should also enable the “75% color” function that limits color intensity.
The three 16-bit components are scaled to 24-bits for display during correction — as well as after processing. If the processed data are fed to an RGB realtime effect, the signal below 0IRE and above 100IRE will be truncated. However, when sent to a YUV-based effect or compressed, encoded, written as uncompressed video to a file, or output — no truncation will be performed. Color correcting HD naturally brings up the question of how you can monitor your efforts. I have connected the DVI output from my Dell laptop to the HDMI input of my Sony 1280x720, LCD HDTV. Now either Liquid’s Player or Recorder window is displayed on the HDTV. Naturally, you will need to calibrate an HDTV to obtain an accurate image. (In fact, any monitor should be calibrated.)
Liquid’s “VGA Second Head” option outputs video in RGB colorspace. Whenever RGB data are viewed, there may be slight color differences between the display and the YUV video. However, since many folks editing HDV will be using consumer HDTVs for monitoring, I’m not convinced the colorspace error is a serious issue for them.
Tip 6: The Liquid Second Head function does not use a VGA driver’s “overlay” capability. Rather, it uses the VGA driver’s second monitor capability. (Do not enable the “Desktop across both monitors” mode.) Under Edit > Control Panel > Site > Video Outputs > VGA Second Head — define “use monitor setup” and “custom framerate = 60.” Whether you use your HDTV’s DVI/HDMI or RGB input, you’ll have to discover a setting for your PC’s graphics driver that fills, as much as possible, your monitor’s screen. This is a topic for another day.
Templates provide efficient ways of working on different projects. For example, I’ve defined 24p and 30p 720 HDV as well as 1080i HDV master sequences. Each sequence includes leader, bars, tone, and trailer. After defining these sequences, I saved them as templates. (I defined one as the Default Template.) Now, when I create a new project sequence — one that will contain the final sequences—I simply choose the appropriate template. The new sequence is immediately ready for use.
In the next installment, I will look at the exact role codec choice plays in a sequence preset. We will confront one of most fundamental debates in working with HDV — should we edit it “natively” or by using an “intermediate” codec. Be prepared to see this technical debate — which is the subject of much marketing hand-waving and editor hand-wringing — from a different perspective.
In the fall, I will focus specifically on this issue by working with Edius 4 from Canopus/Grass Valley. Edius has the ability edit using native HDV as well as an HD intermediate codec, HQ. Like Liquid, it supports multi-format timelines, including 720p24.
In future installments, I will cover auto-handling different aspect ratios for NTSC tape, widescreen DVD, and HD timelines; Dolby 5.1 sound (a value-added function for DVDs and a “must-have” for high-def DVDs); HDV record-to-tape (what is “Smart GOP” MPEG-2 editing and when does it reduce export time?); plus HD-to-SD DVD production.
In this installment, we will look at the exact role that codec choice plays in a sequence preset. We are going to confront one of most fundamental debates in working with HDV — should we edit it “natively” or by using an “intermediate” codec?
HDV can be input as compressed digital data (via FireWire), uncompressed digital data (via HD-SDI), or uncompressed analog data (via analog component). PCI cards such as those sold by Blackmagic and AJA support the latter two paths. The following Table shows these three paths.
|
| Compressed Digital Data | Uncompressed Digital Data | Uncompressed Analog Data | |
| Path | FireWire | HD-SDI | Analog Component | |
| Process |
|
| A/D Converter | |
| Form | IBP-frame & MP2 | Uncompressed Digital Data | ||
| Process |
| Decode | ||
| Audio |
| Digital 48kHz | ||
| Video |
| Digital YUV | ||
| Process |
| 4:2:0 (only MPEG-2) or 4:2:0 to 4:2:2 | ||
| No Codec |
| Uncompressed | ||
| MPEG-2 |
| I-frame | ||
| MPEG-2 |
| IBP-frame (ready for DVD) | ||
| DVC |
| DVCPRO HD (downsamples resolution) | ||
| JPEG |
| PhotoJPEG (draft only) | ||
| CineForm |
| Wavelet | ||
| Canopus |
| HQ HD | ||
| Avid |
| DNxHD | ||
| Bits | 8-bit | 8-bit or 10-bits (not MPEG-2) | ||
| Sampling | 4:2:0 | 4:2:0 (only MPEG-2) or 4:2:2: | ||
| Type | Native | Intermediate | ||
| Storage | Disk File | |||
| | | | | |
Note 1: No matter the connection path, recorded HDV is 8-bit, 4:2:0 sampled data.
Note 2: Green indicates highest quality; Blue indicates high quality; Orange indicates moderate quality; Red indicates low quality. Yellow indicates a direct path.
As the chart indicates, there are many intermediate codecs available. None of them increase the quality of HDV — in fact, with the exception of uncompressed video, all require an additional compression step after HDV has been decoded. Moreover, intermediate codecs (with the exception of IBP-frame MPEG-2) are less storage-efficient than is HDV.
While some consider interpolating 4:2:0 sampling to 4:2:2 sampling an increase in quality, this conversion can also be performed by an NLE when HDV special effects are rendered. Likewise, placing 8-bit data within a 10-bit word does not increase image quality.
Using an intermediate codec, however, does offer four advantages:
Ø During the transcode, it is possible for bad frames and broken timecode to be repaired.
Ø When HDV, an interframe codec, is transcoded to I-frame MPEG-2, the intraframe format can be decoded efficiently, thereby improving performance. Apple’s AIC codec is an example of an I-frame MPEG-2 format.
Ø All intraframe, intermediate codecs can be decompressed with great efficiency. This enables more streams of video to be mixed together. However, because each frame requires greater data, total disk throughput will be much larger than what an equal number of HDV streams would require.
Ø Many projects require video be processed sequentially by several applications. With the exception of PhotoJPEG, intraframe, intermediate formats are more robust than HDV. Obviously, uncompressed video is the least fragile of these codecs. However, Avid, Canopus, and CineForm codecs are all ideal for tasks that require multiple compression cycles.
When a frame of video is needed by an NLE’s display or effects engine, the appropriate codec is automatically employed to decompress an intermediate format or decode MPEG-2 to uncompressed YUV data. (If the source is already uncompressed, it is used directly.) There is a little-mentioned process involved in generating the YUV digital video. HDV’s 4:2:0 sampling is interpolated to 4:2:2 or 4:4:4. For an NLE that uses the YUV color space, this process occurs after the decompression or decode. For an NLE that uses the RGB color space, this process occurs during the conversion from YUV to RGB. Because HDV employs symmetric color sampling, interpolation is straightforward.
For display on a computer monitor, YUV is converted to RGB. However, if your computer has a board that outputs analog component or HD-SDI, the data are not converted, thus remaining in YUV colorspace.
When multiple streams of video are combined (mixed) by a special effects engine, the digital video streams, either RGB or YUV, are processed as either 4:2:2 or 4:4:4 video. The output is, of course, also 4:2:2 or 4:4:4 video. This video, either RGB or YUV, is then processed appropriately for internal and/or external display.
Depending on the number of streams, the nature of the codec(s) employed, the number and complexity of the effects applied, and both the computing power and disk throughput of your computer, the output of the display engine or effects engine may be previewed:
Ø only after some, or all, of the effects have been rendered.
Ø at less than full frame rate
Ø at near full frame rate
Ø at full frame rate
These performance differences must considered when:
A) The editor plays back the timeline
B) The timeline is exported to tape
When exporting HDV, realtime export is not possible. However, using today’s powerful computers, realtime timeline playback is sometimes achievable.
Preview render files are the key to full-frame-rate playback when realtime previews are either not possible or when preview playback performance is poor. Preview files can be generated three ways:
1. Rendered results are compressed and stored in a file. This is the optimal codec option because DVC-based codecs require have moderate computation and disk requirements.
2. Rendered results are simply stored in a file. Obviously, this option requires no computation and so is very fast. Unfortunately, with HD, both disk throughput and storage requirements are huge.
3. Rendered results are encoded and stored in a file. Native MPEG-2 encoding is compute-intensive, although both disk throughput and storage requirements are minimal.
When you specify a Sequence codec, you are specifying the codec that will be used when a preview file is generated. This codec is typically also the default export codec.
Tip 7: Liquid supports the options 2 and 3 for preview files: previews using the “2vuy” uncompressed, 4:2:2 codec and previews using the MP@H-14 HDV codec.
So does it make a difference whether a native or an intermediate codec is employed? The answer is “it can, but need not.” To understand this answer, we must consider is how an NLE utilizes preview files. Here again, there are three options.
1. A preview file is decompressed/decoded and played back at full frame rate.
2. A preview file is decompressed/decoded and processed by additional special effects.
3. A preview file is decompressed/decoded and mixed, using special effects, with additional layers of video.
NLEs such as Liquid and FCP never utilize the latter two options. Preview files are never used for anything except playback.
Native HDV preview files — having gone through two cycles of encoding and decoding — will suffer more than will high-quality intermediate codecs. An uncompressed preview file — assuming your system can handle it — offers little loss in quality as there has been only one MPEG-2 encode and decode cycle. The other high-quality intermediate codecs have undergone one MPEG-2 encode/decode cycle and one compression/decompression cycle.
Obviously, those NLEs that (to save render time) use preview files for further computation (options 2 and 3) definitely are sensitive to whether preview files are native or not. The use of a native codec can result in a severe loss in quality. However, by deleting preview files whenever you need to view a Sequence at maximum quality, the NLE will generate new frames from the source(s).
Exactly the same logic applies to exporting a Sequence. FCP and Liquid never use preview files during export. Both NLEs generate every new frame from scratch. Moreover, those NLEs that default to using preview files during export can be forced to not do so.
With FCP and Liquid, when one uses realtime previews, there is no quality difference between native and intermediate editing. However, when you need to render previews, the use of an intermediate codec does offer slightly greater preview quality.
With other NLEs, performance is the primary advantage of editing using an intermediate codec. Performance is increased in two areas. First, given adequate disk throughput and an effects engine engineered for the intermediate codec, more streams can be handled in realtime. Second, preview files, which took time to render, can be reused. And, when these files are reused, quality is minimally impacted.
Now that we understand how multiple SD and HD formats are processed within a Timeline, in the next installment I’ll show you how Liquid can automatically handle different aspect-ratio video in the same Sequence.
In the previous installment, we examined one of the fundamental debates in working with HDV: should we edit it natively or by using an intermediate codec? After covering this topic, we now almost fully understand how a timeline can hold multiple formats. However, we have not considered one issue. How can multiple aspect ratios be used in the same timeline? Let’s make this an even harder question. How can multiple aspect ratios automatically be used in the same timeline?
In fact, let’s push this to question to the extreme. How can multiple aspect ratios automatically be used in multiple timelines that have different aspect ratios? For example, I have two HD sequences on my PC. One sequence was created as HDV 720p30, and the other sequence was created as HDV 1080i60. The 720p30 sequence contains 720p30, 720p24 (yes, 24p), 1080i60, 16:9 DV, 4:3 DV, and 4:3 MPEG-1 shot with a cell phone. The 1080i60 sequence begins with multiple Sony Z1 clips followed by the entire 720p sequence. I simply dragged the 720p sequence from Liquid’s Sequence Rack (Bin) into the 1080i sequence.
All these, of course, are 16:9 sequences. I also have two 4:3 DV sequences – one that will become an anamorphic DVD and another that will become a letterboxed DV tape. And, while I am not fond of converting 16:9 to pan-and-scan SD video, later in this edition we'll learn how to this, too.
The first step, of course, is to capture all of our source materials — whether 16:9 or 4:3. When all of our clips have been captured, we will perform a magic step. A step that must be done before clips are placed into a sequence. However, I’m not going to reveal the secret yet.
The next step is to create the sequences we need. For each sequence, we can choose from a list of DV and HDV presets: NTSC 4:3, NTSC 16:9, HDV 720p29.97, and HDV 1080i59.94. I could also select 720p23.98 from the Region 60 presets and then select the M2V codec to create a 720p24 HDV sequence. In either case, the resolution for the Sequence will now be defined.
When we define a new sequence, we also define the image aspect ratio and pixel aspect ratio. The pixel aspect ratio will be used when conversions are made between square and non-square pixel video.
My 720p and 1080i sequences have square-pixel and non-square-pixel aspect ratios, respectively. My NTSC 4:3 DV and NTSC 16:9 DV sequences, however, both have a resolution of 720x480 and a non-square-pixel aspect ratio. (The DV format uses a WIDE flag to indicate 16:9 anamorphic video.)
As each clip is placed into a sequence, we would like the NLE to automatically handle it correctly. When the clips have the same pixel aspect ratio, the issue is simply how to match resolutions. When, however, the clips have different pixel aspect ratios, the issue is more complex. Pixel aspect ratios and resolutions for both clip and sequence must both be considered. However, we do not have to do the “considering,” as Liquid will do it for us.
When all your clips have been captured and graphics created, select all of them. Now, right-click and select Properties… and then click on the V-tab. You will have access to two pull-down menus as shown below.
As shown below, by leaving the selection at “Use original” we the use the information from the source clip.

Now, make the selections shown below.

Once this has been done, the following is automatically done:
1. 16:9 to/from 16:9 — uniform scale based upon “X”
2. 16:9 to 4:3 — uniform scale based upon “Y” yielding an anamorphic image
3. 16:9 to 4:3 WIDE — uniform scale based upon “X” yielding a letterboxed image
4. 4:3 to 16:9 — uniform scale based upon “Y” yielding a horizontally centered image.
When we want to place HD clips into a 4:3 sequence and we do not want either an anamorphic or a letterboxed image, we must take a different tack. After all your clips have been captured and graphics created, select all of them. Now, right-click and select Properties… and then click on the V-tab. Next make these selections.
When these clips are used in HD sequences, the following is automatically done:

1. 16:9 to/from 16:9 — uniform scale based upon “Y”
2. 4:3 to 16:9 — uniform scale based upon “Y” yielding a horizontally centered image.
When an HD sequence is moved into a 4:3 sequence, a “center-cut” 4:3 image is created automatically.
To implement Pan-and-Scan, first define all clips as “Fit X.” These can be used in an HD sequence. Then drag the HD sequence into a 4:3 sequence. Next, drag the 2D EDITOR GPU filter onto the clip(s). For 720p, set Horizontal Size to 200%. Now you can keyframe Horizontal Position between +50 (full left) and -50 (full right) to create pans over time—as shown below.
Now that we understand how to work with multi-format timelines, there are two additional topics to consider. First, while stereo audio has been acceptable for standard-def DVDs, as the world moves to high-definition DVDs in 2007, stereo is not going to cut it. Productions must have 5.1 surround sound. Liquid provides a near complete 5.1 audio creation capability.
Second, exporting MPEG-2 is a very time-intensive process as we all know. Liquid provides “smart GOP splicing” technology. Can this save export time? To answer that, we need to understand how this technology works.
Both topics will be covered in upcoming issues of HDV@Work. While this series is not a review of Liquid, it does seem appropriate to make a few comments about my experience editing with Liquid. I have been reviewing NLEs since the days of SuperMac's DigitalFilm, the VideoVision Studio from Radius, and Premiere 3.0. From me, Liquid earns a “my favorite NLE, but …” rating.
The “but” stems from: (1) the lack of keyframing in the main color corrector; (2) the lack of up-to-date, complete documentation (for example, the keyframeable color corrector is not documented); (3) audio editing problems; (4) lack of true 16:9 DVD support; (5) and too many design inconsistencies/bugs. Unfortunately, these kinds of issues involve the type of investment that companies avoid because they do not add sizzle that can be marketed. Nevertheless, in my opinion, the only new function Liquid requires, beyond P2 DVCPRO HD support, is integrated support for burning high-definition DVDs. (However, in a future installment I’ll show you how the latter limitation can be overcome for under $50.)
My “best” rating comes from: (1) Liquid’s "any-in/any-out" capability; (2) integration of almost every production task into a single application; (3) Liquid’s reliability when editing video; (4) display presets that work as well with a laptop as with multiple displays; and (5) an interface that is a true joy to use. The heart of this interface is an extensive, customizable set of toolbars that enables Liquid to function almost “mode-free.”
What are modes and why do I, and others, consider them an invention of the devil? First, it is important to distinguish between two kinds of modes. When you select a group of cells in a spreadsheet and enter Chart Mode, you are linking data to code that uses the data to perform an entirely different function. This is like Trim Mode in an NLE.
The type of mode with which I am concerned made its appearance with the first primitive text processors. These applications had no GUI. Everything was controlled from a keyboard. To insert characters into existing text, you first pressed the INS key to turn-on Insert Mode. (If you have a PC, you likely still have this key on your keyboard.) Once you entered Insert Mode, the keyboard continued to insert text.
When you wanted to replace existing characters, you pressed the INS key again to enter Overwrite Mode. Once in Overwrite Mode, the keyboard continued to overwrite text. Thus, whenever a fast touch typist became distracted after making a correction, they could wipe out vast amounts of text before looking up and seeing the OVR indicator was on! (Just for fun, next time you are using Microsoft Word, press the INS key and/or click the OVR button in Word’s status bar.)
The first Avid was designed in the DOS days and not surprisingly has Extract/Splice-in and Lift/Overwrite modes. And while Apple boasts that FCP does not have a “modal timeline," it does use a modal toolset. (Premiere likewise has a model toolset.) Simply put, a modal interface is one where what the computer does upon your pressing a key or clicking a button depends on what mode the interface is in. It's up to you to remain aware of the mode.
A non-modal interface does only what you directly command. You need only decide what you want to do and press a key or click a button to accomplish the task. You need not consider what mode is currently active. For example, the more modern Edius 4 interface has toolbar buttons for ripple and non-ripple deletes and ripple and non-ripple inserts. Interestingly, since PC keyboards offer both del and backspace keys, Liquid’s programmers missed the opportunity to support a mode-free non-ripple (del) and ripple (backspace) delete command.
Update: A luma (Y) signal ranges from 16 to 235. The Cb and Cr components range from -112 to +112, each of which is offset by 128, yielding a range of 16 to 240. This explains why Avid supplied both “235” and “240” values to me in describing its “2vuy” 4:2:2 uncompressed codec.