Creating Media Files
Although it is true that media files need to either be imported or digitized to be used in Liquid, the exceptions are certain types of media you can create inside Liquid.
These fall into five categories:
- Creating a color clip
- Creating a signal clip
- Creating a DVD menu
- Creating a title
- Creating a SmartSound clip
You'll learn how to create a DVD menu in Chapter 12, a title in Chapter 10, and a SmartSound clip in Chapter 7. This next section explains how to create color and signal clips.
Creating a color clip
You'll often create a color clip to function as the background in an effect or to be used for the lead-in to start a video or the lead-out to end it.
To create a color clip:
- Do one of the following:
- Select the Rack inside which you want to create the clip, and right-click in the right window of the Project Browser.
- Right-click on the Rack Window button
 at the top right of the Project Browser.
- From the contextual menu, select Create > Color Clip ( Figure 3.31 ). This brings up the Color Matte Clip box.
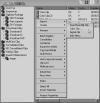
Figure 3.31 Accessing Create > Color Clip.
- On the right side of the box, choose from three settings: Single color: A standard color clip made from the color of your choice ( Figure 3.32 ). Linear Gradient: Uses two colors and creates a gradual fade from one color to the next on a user-defined path. A path is created by clicking the mouse inside the color window and dragging the cursor around to create the desired effect ( Figure 3.33 ).
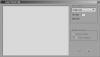
Figure 3.32 Choosing a single color.
Circular Gradient: Uses two colors and creates a gradual fade from one color to the next in a circular pattern from a user-defined radius. To create a user-defined radius, click anywhere inside the colored area and drag the point of the circle outward or inward ( Figure 3.34 ).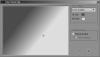
Figure 3.33 A linear gradient color clip.
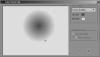
Figure 3.34 A circular gradient color clip.
- Choose which color you want by clicking the small colored rectangle to bring up the color picker ( Figure 3.35 ).
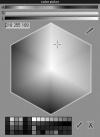
Figure 3.35 The color picker tool.
- Once you have decided on a color, click the check mark to exit the color picker.
- Click the check mark to exit the Color Matte Clip window. A color clip is created in the Rack you have selected. You can insert this new media clip into the Timeline or the Source Viewer and use it just like any other media clip.
)
)
)
)
)
)
Creating a signal clip
The use of a signal clip is somewhat esoteric; all you actually create is a WAV file with a single beep inside it. Some editors use this to give the end of scenes an audio mark or to create an audio queue that they can use as a guide while editing. The rest of us will find its functionality less remarkable.
To create a signal clip:
- Do one of the following:
- Right-click inside the right window of the Project Browser.
- Right click on the Rack Window button at the top right of the Project Browser.
- From the contextual menu, select Create > Signal Clip. The signal clip is created inside the Rack you have selected.


No comments:
Post a Comment